 I FINALLY MADE SOMETHING!!
I have been seeing these ADORABLE pillowcase dresses and have always wanted to try one. I decided to make a couple for my cousin's step-daughter and my best friend's baby. I searched for directions and found one that suited us. I say "us" because I got a HUGE amount of help from my mom. I've never sewed before so she was a big help. Thanks mom!!
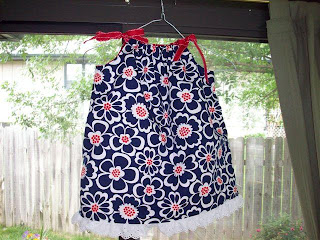
The fabric that inspired this dress was found at a garage sale yesterday. I thought it was the perfect fabric for a Fourth of July outfit.
Supplies:
- 2- 36" x 17" pieces of fabric. We chose the Fourth of July pattern and got some red and white polka dot at Hobby Lobby
- Ribbon for your sleeves
- Navy blue thread (Anything that will blend in with your fabric
- White pretty stuff to go at the bottom :)
1. Cut your fabric. 36" represents the width of your dress. This makes a VERY wide dress. Measure the child you would like to make the dress for. I used 16" for a one year old. It touched her toes :) Obviously make sure all sides are straight.
2. Sew a 5/8" seam on each rectangle with right sides together. This will form a large "tube" of fabric. Press seams together using an iron.

3. After sewing, pin the rectangles together at the top; again right sides together. Make sure the seams match up. This will be the back of the dress.

4. Draw a pattern on cardstock or thick paper for the arm holes. Ours was 3 inches wide, with the longest point being 3.75. Trace the pattern onto the dress using pen. It's ok to use pen because your tracing on the inside of the dress and no one will see it :)
5. Mark an inch down on both sides of the pattern. This will allow room for the ribbon. Sew around the arc you have created. Don't stitch the inch you marked!! Trim the excess fabric and be sure to clip the curves so you don't end up with bubbly fabric.
6. Using a very narrow seam allowance (around 6/8"), stitch from armhole to armhole across the top of the dress. Be sure to leave room to put the ribbon through. Do this for the front and back of the dress. Trim excess fabric and flip right side out.
7. Press the dress. This allows for seams to flatten.
8. Cut your ribbon at least 26". Longer ribbon will allow for longer bows. Remember you will be "scrunching" your fabric so the ribbon will be longer than you think.
9. Pin the end of each ribbon and feed through ribbon holes at the top of the dress. Be sure ribbon does not become twisted inside the dress and is even on both sides.

10. Find the "center" of the dress. "Scrunch" fabric until it is three inches from the center. Pin through ribbon and fabric so ribbon doesn't slip out.
11. Stitch again through ribbon and along the armholes of the dress. This allows for a nicer finish to the dress. Tie the ribbon at the shoulders.
12. This next step was one we had to figure out ourselves :) We wanted to have a cute ruffle at the bottom. Steam press the bottom of both the lining and dress.

13. Slide the frill in between the lining and dress and stitch.
14. Find a cute model and show off your new dress!! Unfortunately, I couldn't find one on short notice so here are some close up's in my sun room :)
 Close up of the pretty frill ribbon we used at the bottom.
 Close up of the adorable red ribbon that matches the lining PERFECTLY!

My dress :)
DISCLAIMER: I apologize for any crazy formatting : ) I'm still getting the hang of this!


